
How to convert a high-resolution PDF file to a JPG with reduced file size? We show you different solutions to convert your PDF to JPG – with and without Adobe Acrobat Pro, computer functions and using helpful online tools.
You may have encountered the following problem: You have a PDF document and would like to embed its contents as a preview image on your website or simply display it on your smartphone. Instead of uploading high-resolution PDFs, you should use a reduced file format such as JPG (JPEG) to reduce the loading time of your website. We show you how to convert a PDF to JPG.
Contents
PDF to JPG with Adobe Reader
The free Adobe Reader is installed on almost any computer. It does not allow you to export a PDF directly to JPG, but you can get there by taking a small detour. “Clipboard” or “screenshot” is the magic word in this context.
Taking a screenshot
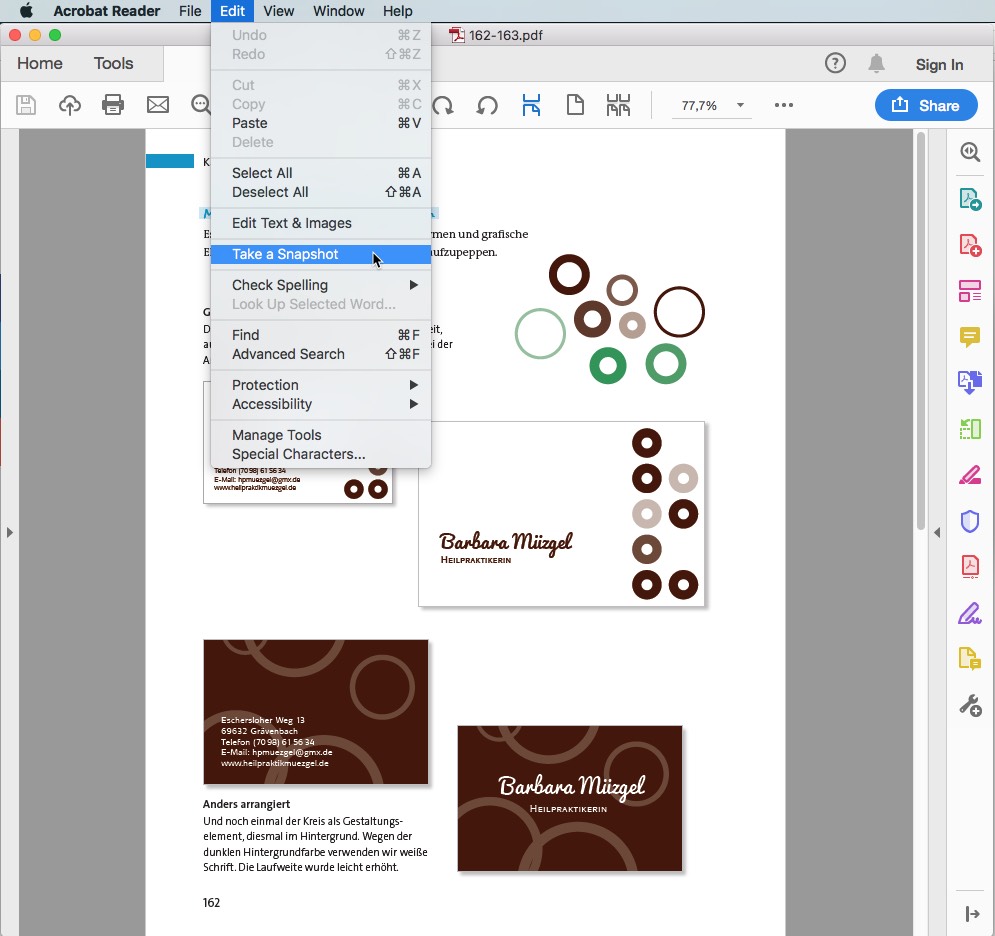
Here’s how to: Choose Edit → Take a Snapshot. The mouse pointer then changes into a cross hair which you can use to drag a rectangle around the area you want to copy. After releasing the mouse button, the area inside the rectangle is coloured and automatically copied to the clipboard. You can either print the selected area directly or edit it in another program.
The default setting for screenshot resolution in Acrobat Reader is 72 dpi.
To print, open the context menu and click Print. To further use the screenshot or convert it to JPG, use another application such as Adobe Photoshop, Adobe InDesign or Microsoft Word.
Conversion with Photoshop
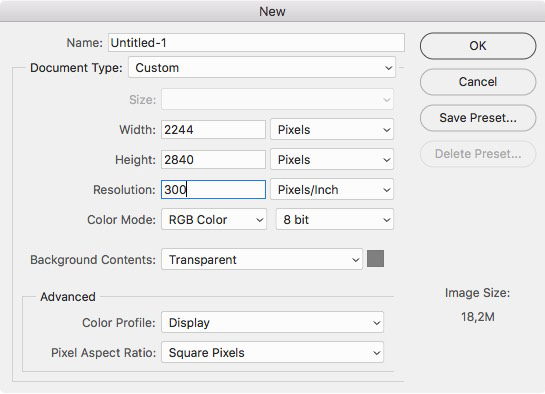
In our example, we use Photoshop to convert the PDF to JPG. Create a new file in your image editing program and choose Clipboard under Presets. This tells Photoshop to automatically use the dimensions from the clipboard with 72 dpi. You should correct the resolution to 300 dpi if you need a high-resolution JPG. To insert the data into the new file, click Paste or press Ctrl+V. Then save your file in JPEG or JPEG 2000 format and voilà! There it is, your JPG.
JPG vs. JPEG 2000: JPG is a widely known image format. The data are downsampled to achieve a great level of compatibility. Images in JPEG 2000 format do have a better compression rate, but they are only supported by few programs and therefore this format is used less frequently.
Image resolution during export from Acrobat Reader

You can also change the setting for the screenshot in Adobe Acrobat Reader. The standard resolution of 72 dpi often delivers insufficient quality, especially when working with text but also with image data. If you need a higher resolution, go to the General category in the Preferences of Adobe Acrobat Reader and choose Use fixed resolution for Snapshot tool images and set the resolution you need, e.g. 300 dpi.
Important: When pasting the screenshot into Photoshop, you should set the resolution of the new file to 300 dpi. Otherwise, the default values of Photoshop (usually 72 dpi) will be downsampled again.
When inserting a screenshot into Word or InDesign, the predefined values of Adobe Acrobat Reader are preserved. But you can change or ideally reduce the resolution again when converting to JPG.
JPG export from Adobe Acrobat
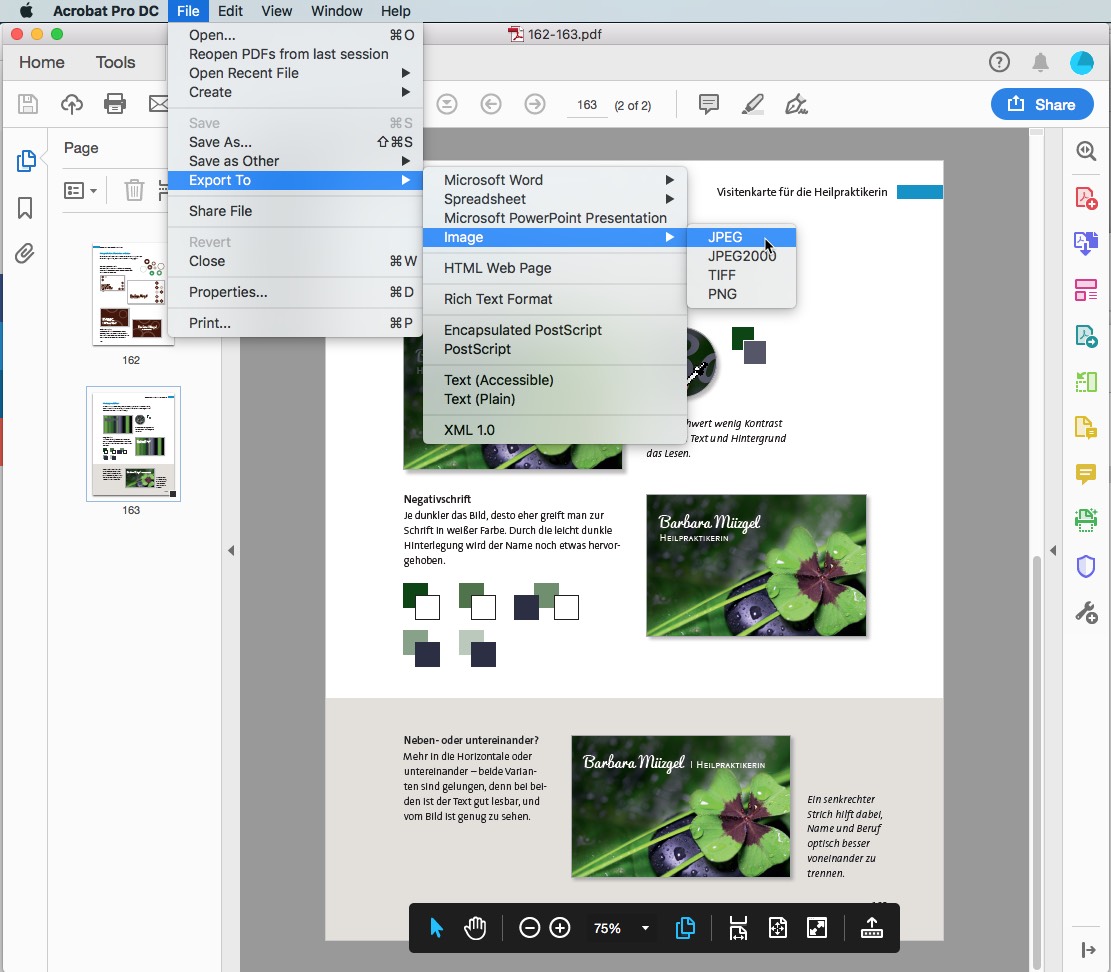
If you have the full version of Adobe Acrobat installed on your computer, you can convert directly to JPEG format in a few seconds – without taking the detour via the clipboard and an additional application program. Another benefit is that you can adjust the options for exporting PDF to JPG.
For this purpose, open the PDF and click File → Export To… → Image → JPEG or JPEG2000. Alternatively, click Tools → Export PDF. In the list of file formats, click Image and enable JPEG or JPEG 2000. You can configure the conversion settings by clicking the gear icon adjacent to the selected file format. If you have used the first method via the menu, you will find the same settings under Settings in the Export dialog.
Defining settings for JPG export
When saving a JPG, you can specify the File Settings, Color Management and Conversion in the Settings dialog box.
You can define the compression settings at Grayscale or Color. The lower the quality, the smaller the file size. The selection under Format only affects the web display. Choose Baseline to display the image when it has fully downloaded. This is the right choice in most cases.
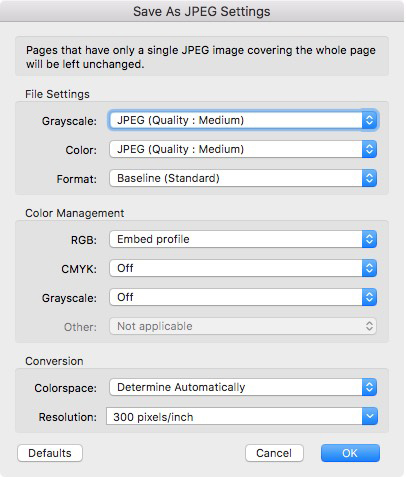
Color Management lets you specify the settings when working with ICC colour profiles. If you export the JPEGs using the Export All Images command, the display of your images may be different than in the PDF. This may be due to the fact that a profile was embedded in the PDF but not in the individual image data you export.
Under Conversion, you can define the Colorspace and the Resolution. To convert your image data to grayscale, choose Colorspace: Grayscale. The Resolution enables you to set the quality and thus the size of the JPG. Important: The resolution is entered in pixels per centimeter here, which is rather unusual.
A brief refresher: 1 cm = 2.54 inch
So you should choose 59.06 pixels/cm for 150 dpi from the list and select 118.11 pixels/cm for 300 dpi.
Exporting multiple or single images from the PDF
Extracting only the images in the PDF and exporting them to the JPEG format is done in a breeze. Click Tools → Export PDF → Image and enable the Export All Images checkbox. This command does not convert the pages of the PDF to JPG but only the images contained in the PDF.
You need just one image? This, too, is a cinch if you have the full version. Use the Selection Tool for text and images to select the image in question and choose Edit Image in the context menu. The image opens in your specified image editing tool such as Adobe Photoshop. Now save it as JPEG. Done!
Did you know? You can specify the preferred image editor used to open the image in the Preferences dialog of Adobe Acrobat in the Content Editing category under Image Editor.
PDF to JPG via screenshot functions
If you don’t fancy using Adobe but still need your PDF page as JPEG, you can use your system’s on-board screenshot functions or external tools such as Snagit, Snipping Tool Plus or Greenshot. The settings for resolution and other options are usually limited and depend on the tool used to take the screenshot.
Taking screenshots in Windows
Just open the desired PDF document and press the Print key on your keyboard to take a shot of the entire screen content. Press Print + Alt to create a screenshot of the active window in Windows. Windows automatically saves the screenshot to the clipboard and you can copy it into another program via Ctrl+V. Programs like Snagit work in a similar manner. You can save the screenshot directly as JPG there, too.
Screenshot function for the Mac
Use the shortcut Shift+Cmd+4 to take a screenshot of a specific area with your Mac. To take a shot of the entire screen content, press Shift+Cmd+3.
Next open Mac’s on-board Preview application. The program normally recognises the data from the clipboard automatically. Click File → New from Clipboard or press Cmd+N to promptly get a new file containing the screenshot from Acrobat. You can also click Open to open another screenshot. Save your screenshot by clicking Export and choosing to save the JPEG or JPEG 2000 to the desired location.
Web-based conversion
You can also work with external, web-based conversion tools. Free converters like LightPDF or PDFtoimage all take a similar approach: The user chooses the desired command on the provider’s website, in this case the conversion from PDF to JPEG, and subsequently uploads the PDF to the website and gets back the JPEG file(s) either automatically or after downloading it.
It’s worth comparing the providers, because most do not provide a varied range of setting options. What is more, some of the exported JPGs differ significantly in terms of quality and resolution. Therefore, choose the tool based on how you intend to further use the image. We have taken a closer look at some of the tools:
lightPDF
![]()
To work with lightPDF, go to the homepage and click the PDF to JPG icon. In the next window, click the plus sign to select the file and choose the PDF you wish to convert. The conversion starts automatically after the file has been uploaded. Then click on the download arrow to start downloading the new JPEG to your computer. As with many online services, there are no possibilities to influence the conversion process. lightPDF, for instance, converts with 100 dpi resolution. It is generally possible to convert several PDFs at once.
Convertio
![]()
The result of online provider Convertio is similar. This tool is capable of directly accessing files from Dropbox or Google Drive. Upload your PDF to the Convertio server, choose the format you want to convert to and click Convert. Besides JPG, you can select other image formats such as svg, GIF or PSD. Click Download to transfer the new JPEGs to your computer. There are no setting options in Convertio. At 200 dpi, the resolution is twice as high as in LightPDF. You thus get much better quality but also significantly larger amounts of data.
online2pdf
![]()
Further differences become apparent when comparing the two tools with our third provider: The platform of online2pdf seems a little outdated but does the job nicely and offers some advantages compared to LightPDF and Convertio. After uploading the file, the converter also allows you to select the desired target format. Moreover, you can rotate, split or unlock the file. Before the service starts converting PDF to JPG, you can adjust the quality, resolution and colour mode by clicking Compression. After the download, we check the file size and the quality and we are satisfied with both: The file size is smaller than with Convertio and the quality is better.
Other providers
There are other online tools to easily convert PDF to JPG:
ilovePDF converts with 150 dpi; Smallpdf converts PDF to JPG with 300 dpi and offers the possibility to either convert whole pages or just the images in the PDF to JPEG. What is more, the user can create and send a download link for the file to the recipient. Smallpdf also specifies that the data will be deleted from the server after one hour. Many other providers do not give any information on how the data is handled.
Conclusion: It is worth comparing the providers
Adobe users can easily use Acrobat to convert whole pages, multiple or single images from PDF to JPG. But you can also reach your goal by taking small detours without the full version of Adobe Acrobat. Whether you use a combination of the free Acrobat Reader and Photoshop, Word or InDesign or prefer your system’s on-board screenshot functions should depend on how you intend to use the final JPGs. If data theft is not your concern, you can also solve your problem quickly using web-based tools such as Online2PDF. It is worth comparing the providers since the setting options are either non-existent or very limited depending on the conversion tool.
Credits:
Tutorial and design by Claudia Korthaus.