
Users were enthusiastic when Google made the Google Nik Collection available for free in March 2016. Google promises users to “easily create the photos you’ve imagined” with this Adobe plug-in for Photoshop, Lightroom and Aperture. We will introduce you to the features of this versatile tool using three visually powerful examples.
Contents of this article:
Installing the Google Nik Collection
The link nikcollection.dxo.com takes you directly to the download page of the Nik Collection. Click the Download button to download the plug-in for Windows or MacOS. Installation is easy: Simply execute and install the downloaded file. During the installation process, Google Nik Collection will link with Photoshop and with Lightroom and Aperture (if installed). When you open one of these programs, you will notice that the new Nik Collection window has been added.
Overview and functions of the Google Nik Collection
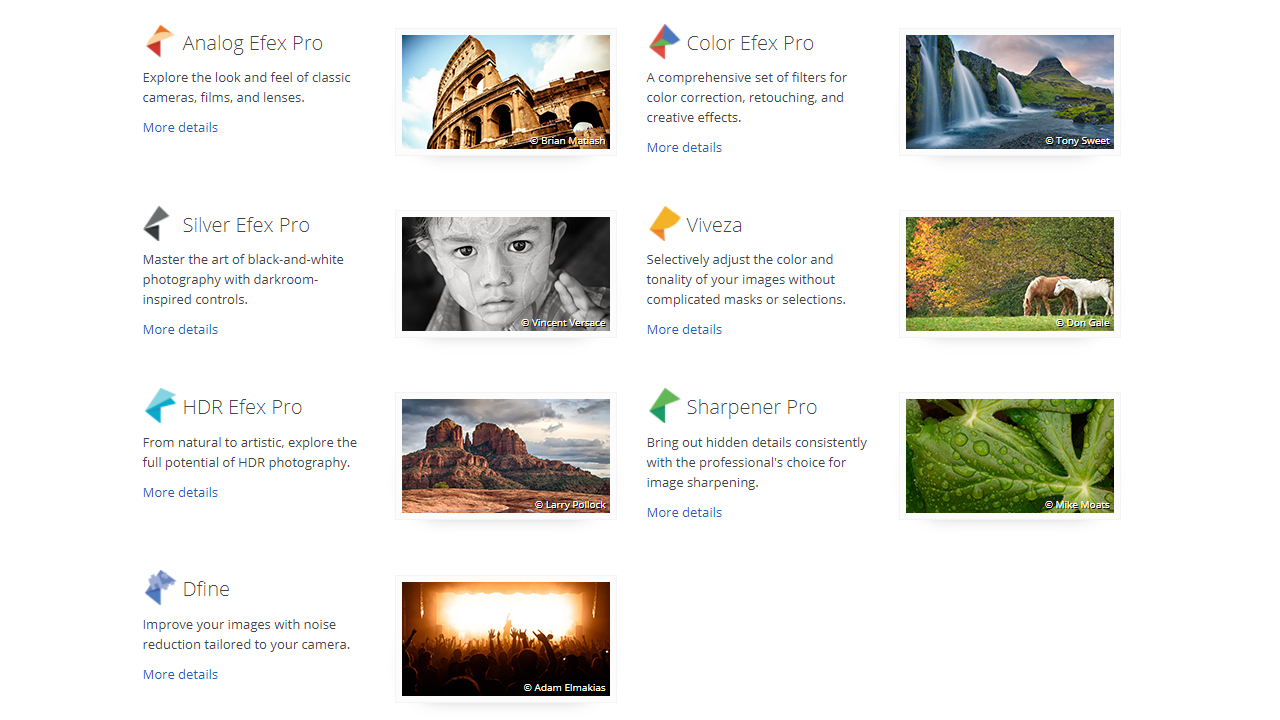
The Google Nik Collection comprises seven different tools:
- Analog Efex Pro
This Nik Collection plug-in includes several filters of classic cameras. They can be used to create stunning vintage photos and generate unique moods. - Color Efex Pro
Probably the most popular plug-in of the Nik Collection, Color Efex Pro includes all standard colour correction and retouching tools. It also allows creating graphic effects such as vignetting. - Silver Efex Pro
This tool is used to edit black and white images. Silver Efex Pro gives you control over light effects, grey scale variations and other settings to create your perfect black and white photo. - Viveza
Viveza allows applying diverse colour correction options to your picture similar to Color Efex Pro. But the tool is designed for selective image editing. You can choose exactly which areas to edit. - HDR Efex Pro
This tool delivers the full gamut of options to control the light source in an image, letting you increase or reduce sunshine, for example. - Sharpener Pro
Use Sharpener Pro to enhance subtle details and touch up your original images for more sharpness. You can highlight edges or bring out hidden details. - Dfine
This tool lets you adjust contrast and reduce colour noise separately. By using various sliders, you can eliminate noise to obtain a crisp image result.
The user interface of the Google Nik Collection
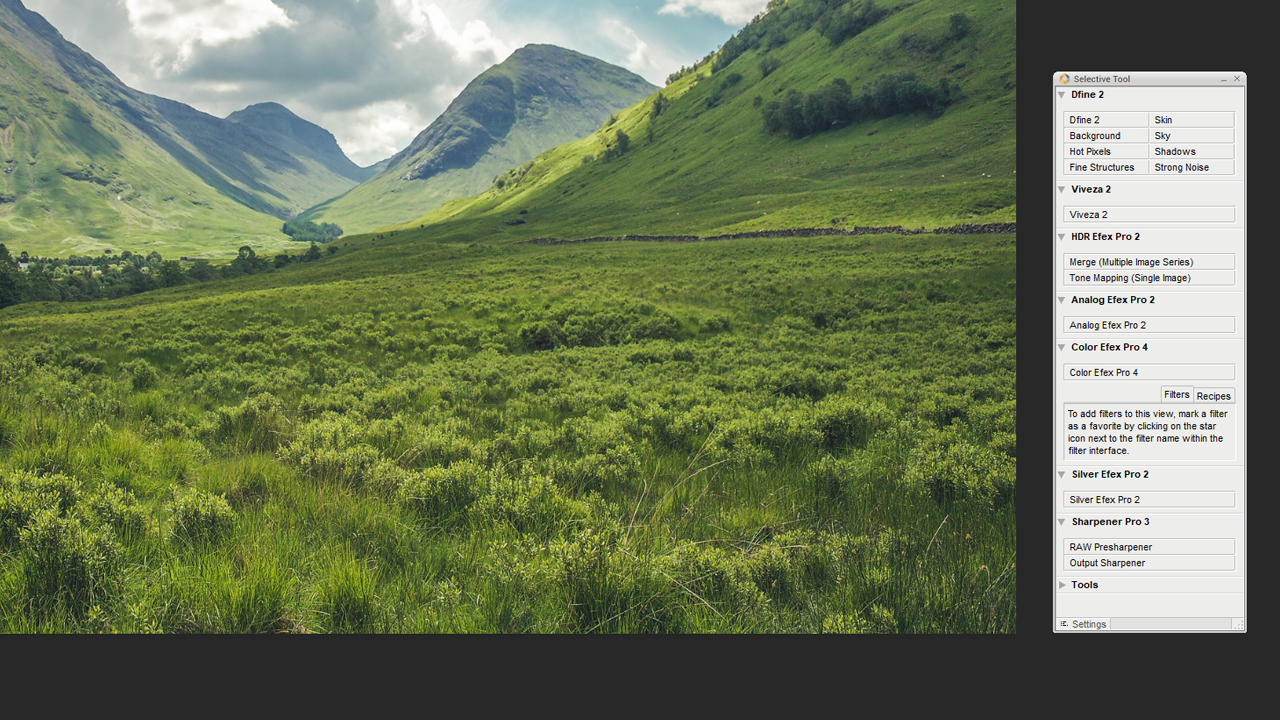
When you start Photoshop for the first time after installing the Nik Collection, the “Selective Tool” will run immediately. It displays a list of the image editing tools mentioned above. To use one of these tools, first open an image. Next transform it into a smart object. This step is necessary to allow the image to be edited again after a plug-in has been applied.
Once you have done this, click one of the tools to start image editing. A message is displayed informing you that the image has been converted to a smart object. Confirm the message with Ok.
Elements of the edit view in the Google Nik Collection
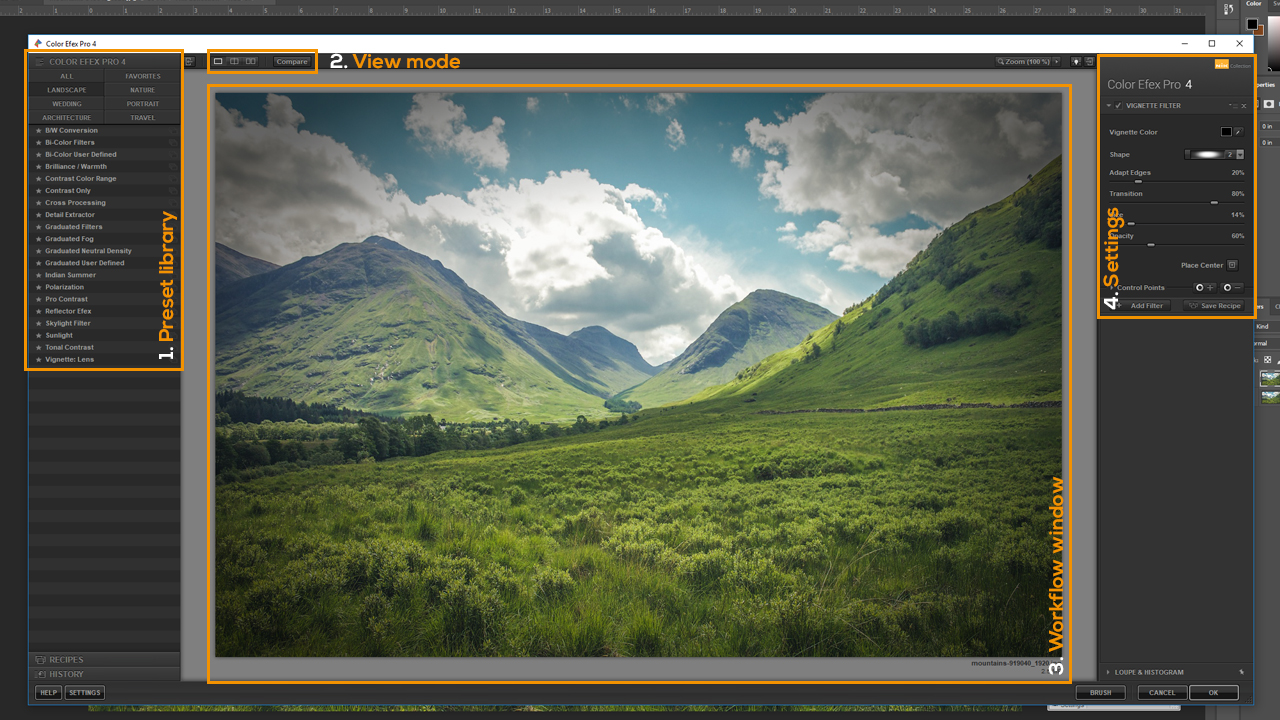
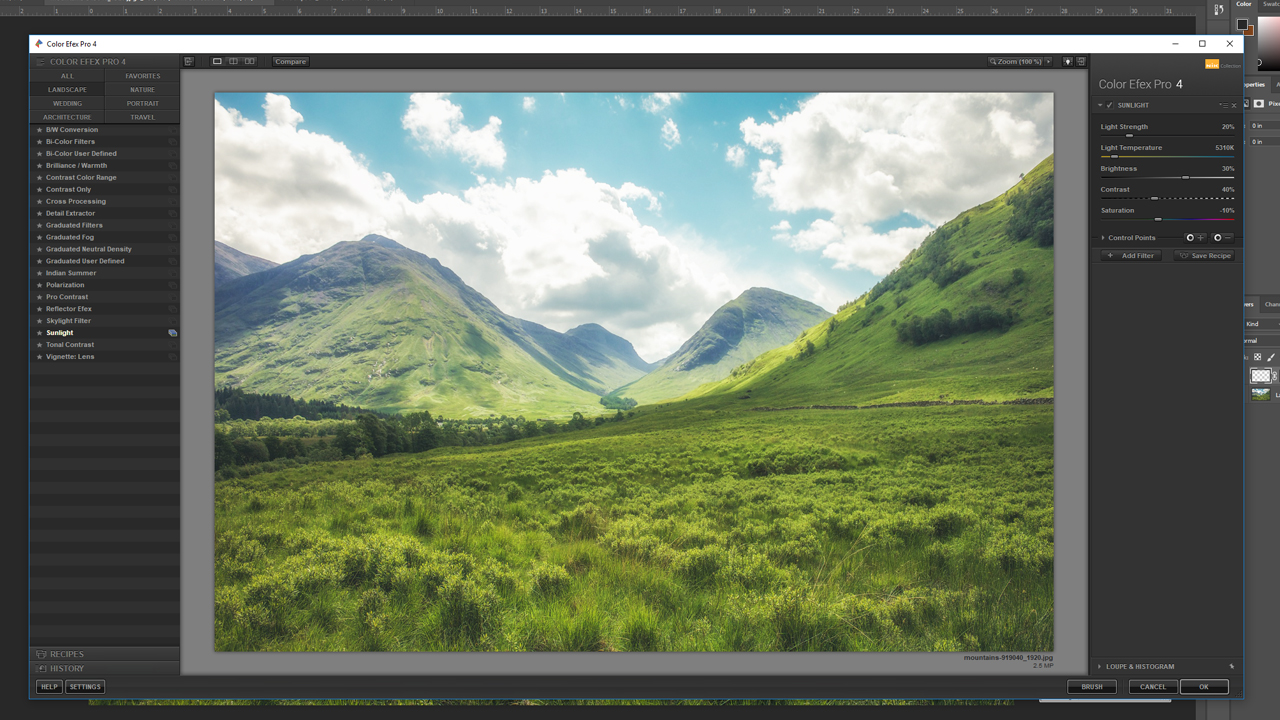
- On the left, you see the filter presets. Here you can select multiple presets and sort by specific image types. You can choose the “Landscape” category, for example, to only show filters that are suitable to edit landscape photos. Further categories are Wedding, Architecture, Nature, Portrait and Travel. Click the asterisk before a filter preset to move it to the “Favorites” tab for easy access.
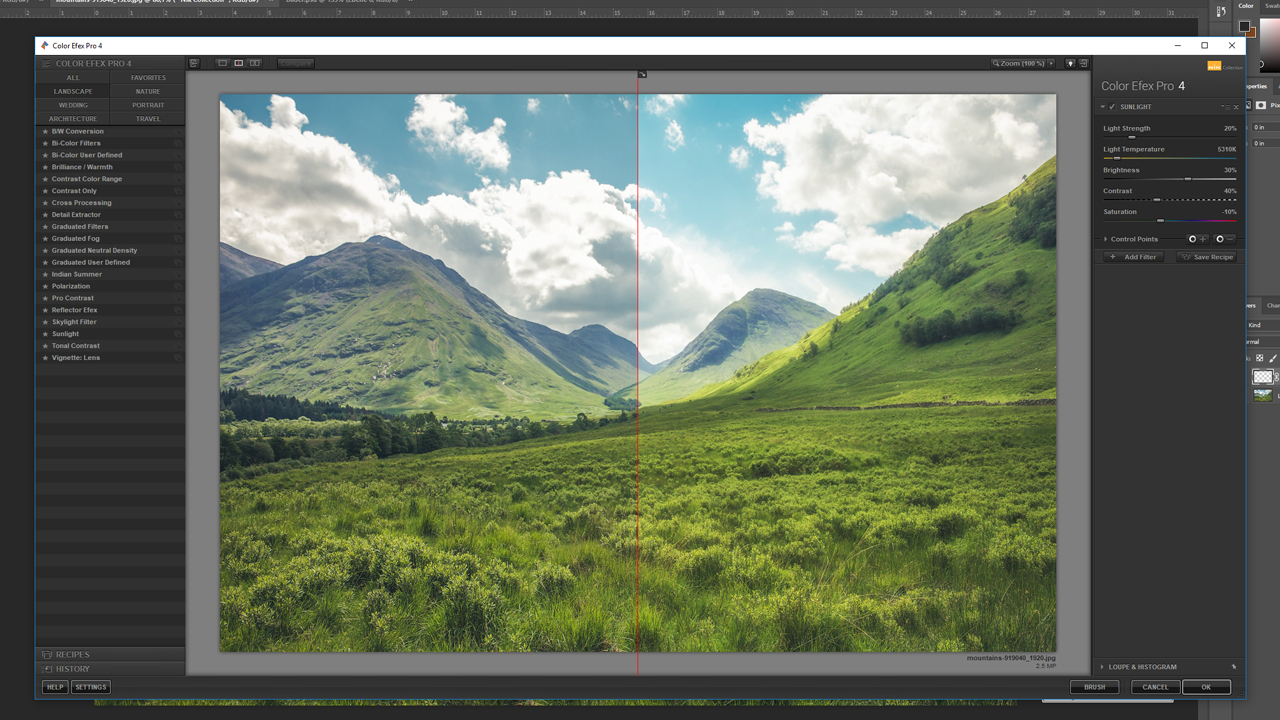
- In the centre, you see the main editing window with the image. This view can be divided using the three buttons above the image. Moreover, you can split the image so that two different previews appear: the before- and after-image. The red vertical line is the boundary between “edited” image and “original” image. You can move this line to the left or right with the mouse to get a better impression of the effect applied. A variation of the before/after display is the horizontally split preview.
- The right-hand side contains the corresponding sliders to adjust the effect after applying a preset. The “Classical Soft Focus” filter on the right allows you to adjust the Diffused Detail, Diffusion, Strength, Brightness, Shadows and Highlights. Each preset can be set individually. You have to play around with the settings to get the desired effect. The possibilities are infinite. Additionally, you can set control points that allow adding multiple presets. This works similar to the Layers panel in Photoshop.
- Once you have finished editing, click OK to compute the original image with all applied settings. The layer window now contains the image which is linked with a smart filter. Double-click this smart filter to return to the editing window of the Nik Collection. However, this is only possible because the image was transformed to a smart object first.
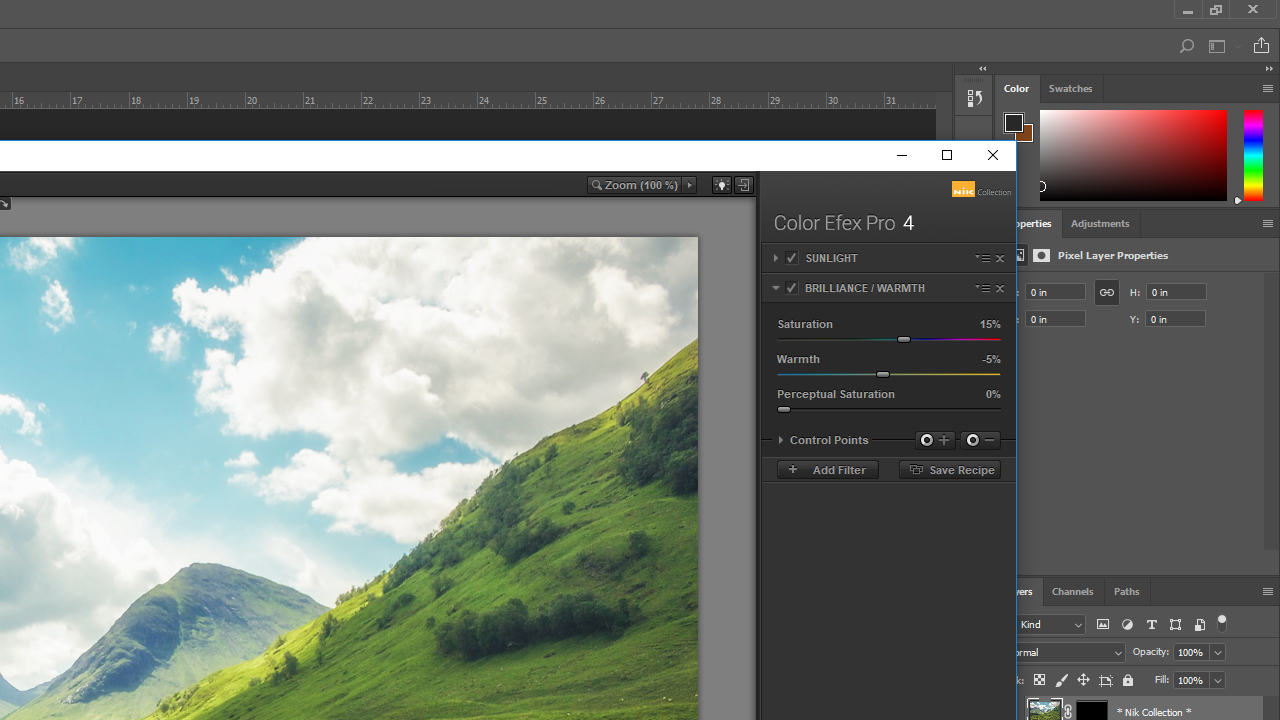
Color Efex Pro of the Google Nik Collection
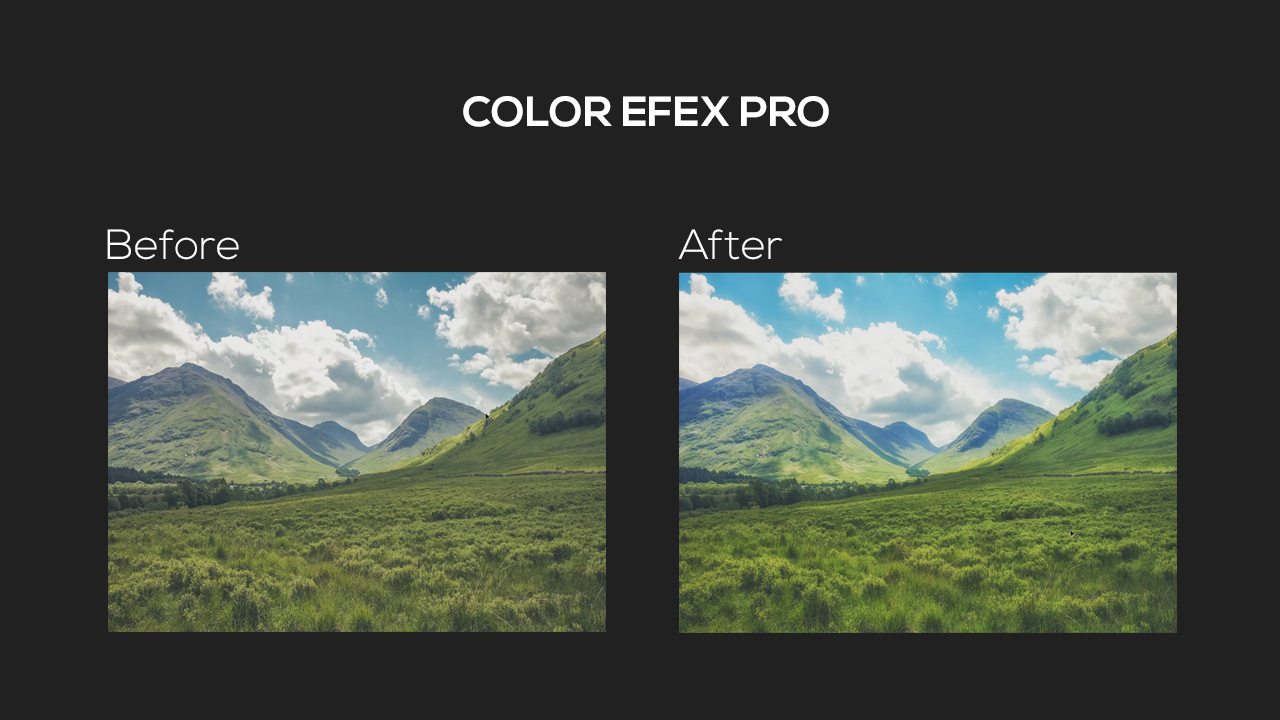
Our goal in the example: We want to create crisper colours for the landscape image. We will use Color Efex Pro for this purpose. The picture is a landscape photo so we will select the Sunlight preset from the Landscape category. Using this filter preset, we increase the strength on the right side and set the colour temperature to 6500 Kelvin, the value of natural daylight. Also, we slightly turn up the brightness and saturation. The colours have become much more intensive as a result but they also appear rather cold. We can create a new preset container by clicking the Add button. We now use the “Brilliance / Warmth” filter preset. We turn up the saturation again a bit and adjust the image’s “warmth”. After you have made this setting, click OK to complete editing and recompute the image with the respective filter presets applied.
The result: a warm, vibrant landscape with a rich green reminiscent of summer.
The Viveza plug-in from the Nik Collection
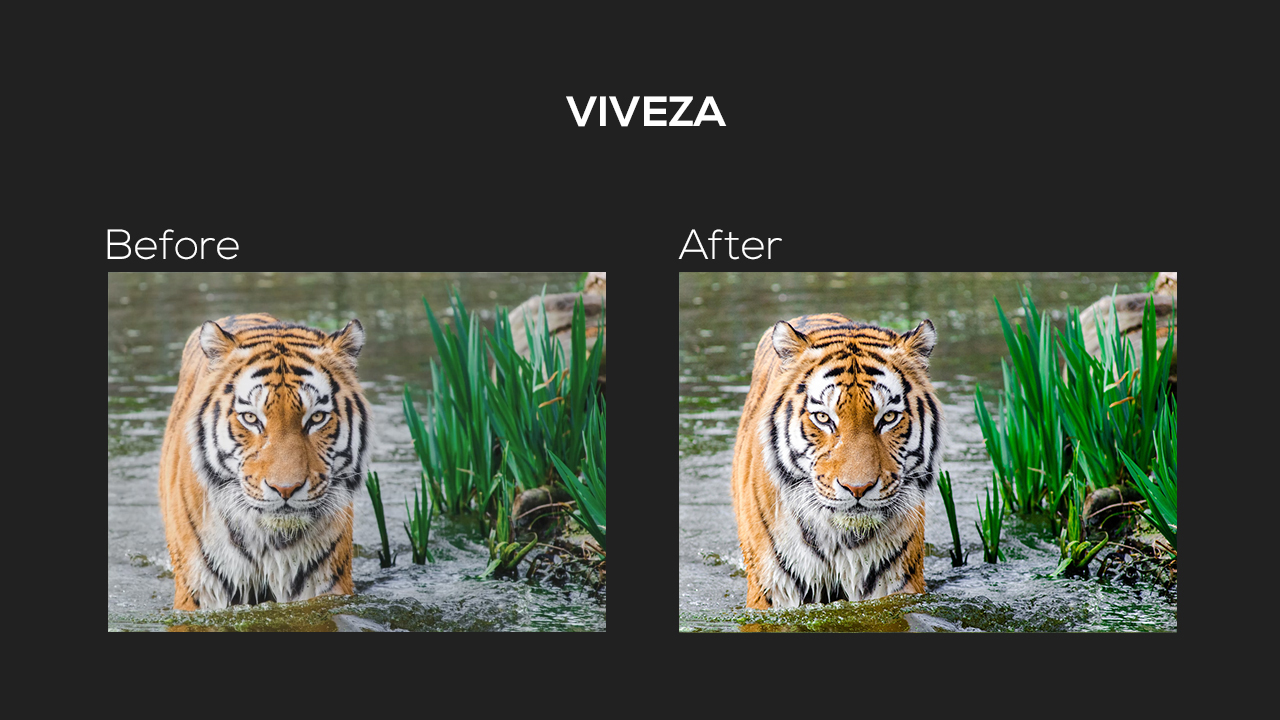
The next photo has a somewhat dull appearance. Especially the tiger could be more vibrant and brilliant. The Viveza plug-in from the Google Nik Collection is ideal for this purpose because it allows selected areas of an image to be edited.
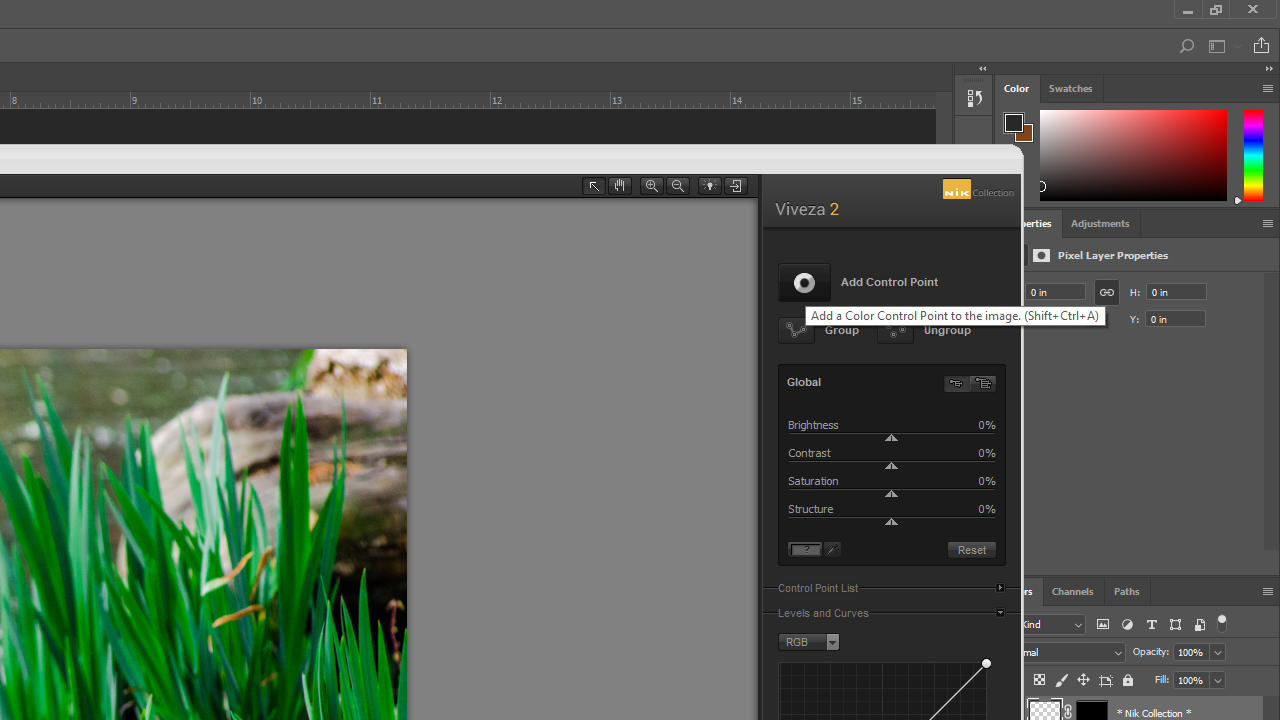
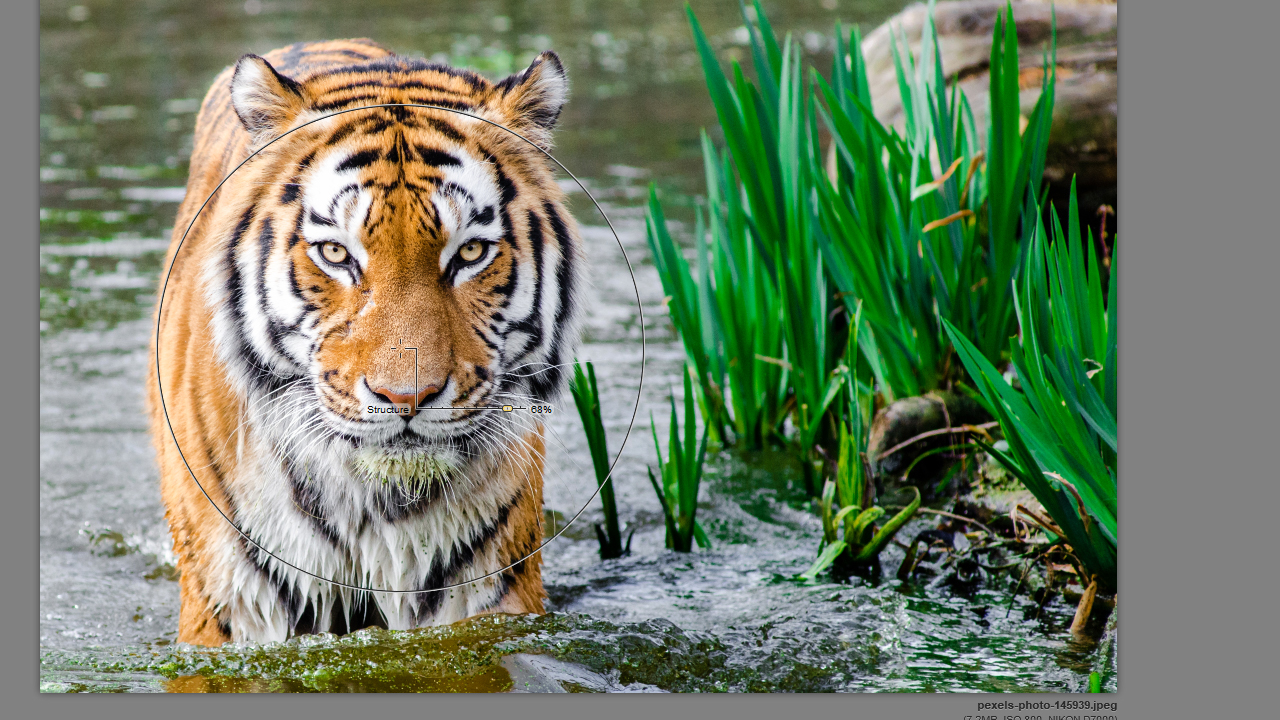
First select the area to be edited by clicking the Add Control Point button in the editing area. In this case, we position the control point on the tiger’s nose. The small menu now displayed at the control point is a compact version of the settings on the right-hand side. The topmost slider adjusts the size of the control point. Below, you see the sliders for brightness, contrast, saturation and structure. When moving these sliders, the sliders in the right-hand menu will be updated accordingly. Move each of these sliders a bit to the right so that the tiger clearly comes to the foreground. Afterwards, you can click on a free space within the image to deselect the control point. If you adjust the sliders in the right menu again, the entire image is edited.

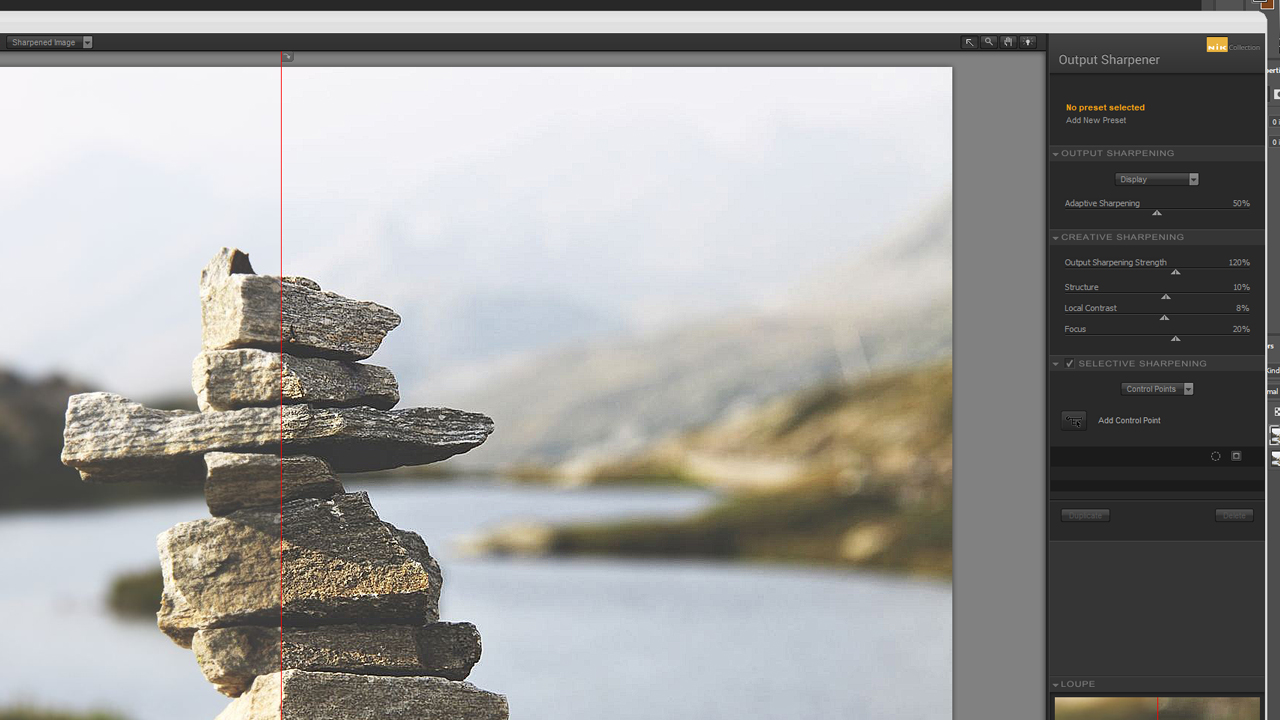
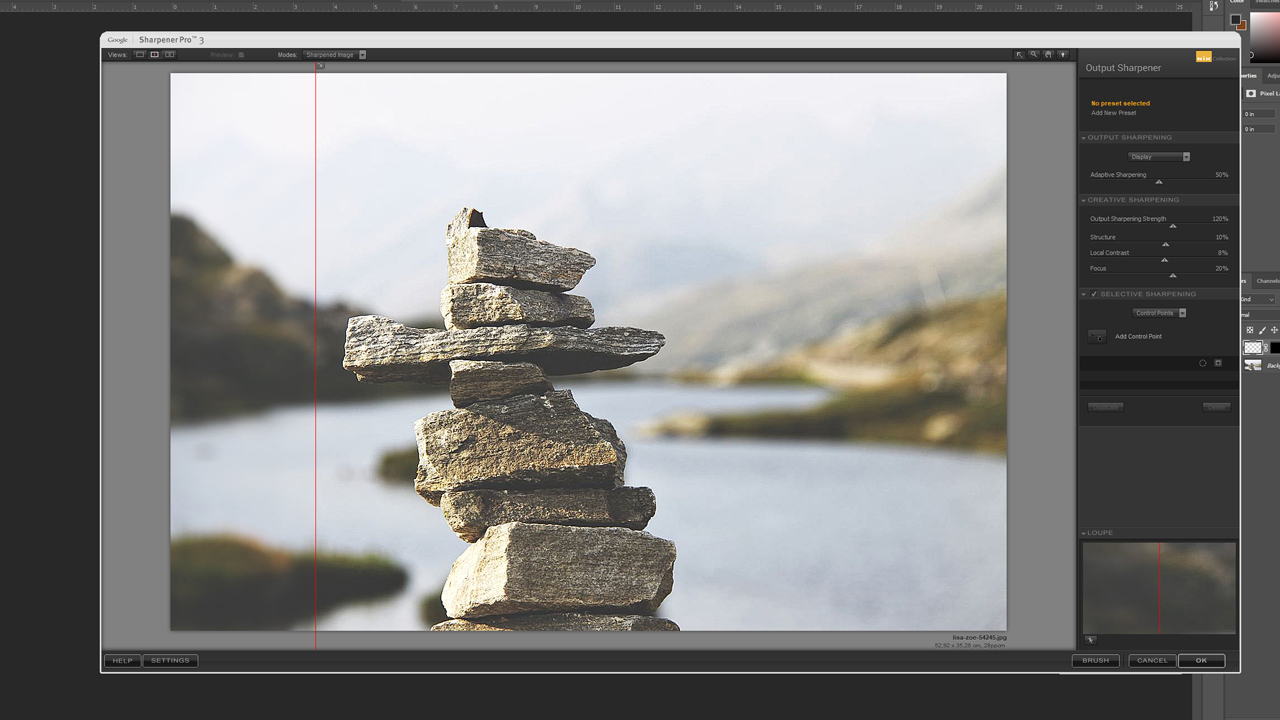
Our favourite tool among the Google Nik Collection: Sharpener Pro
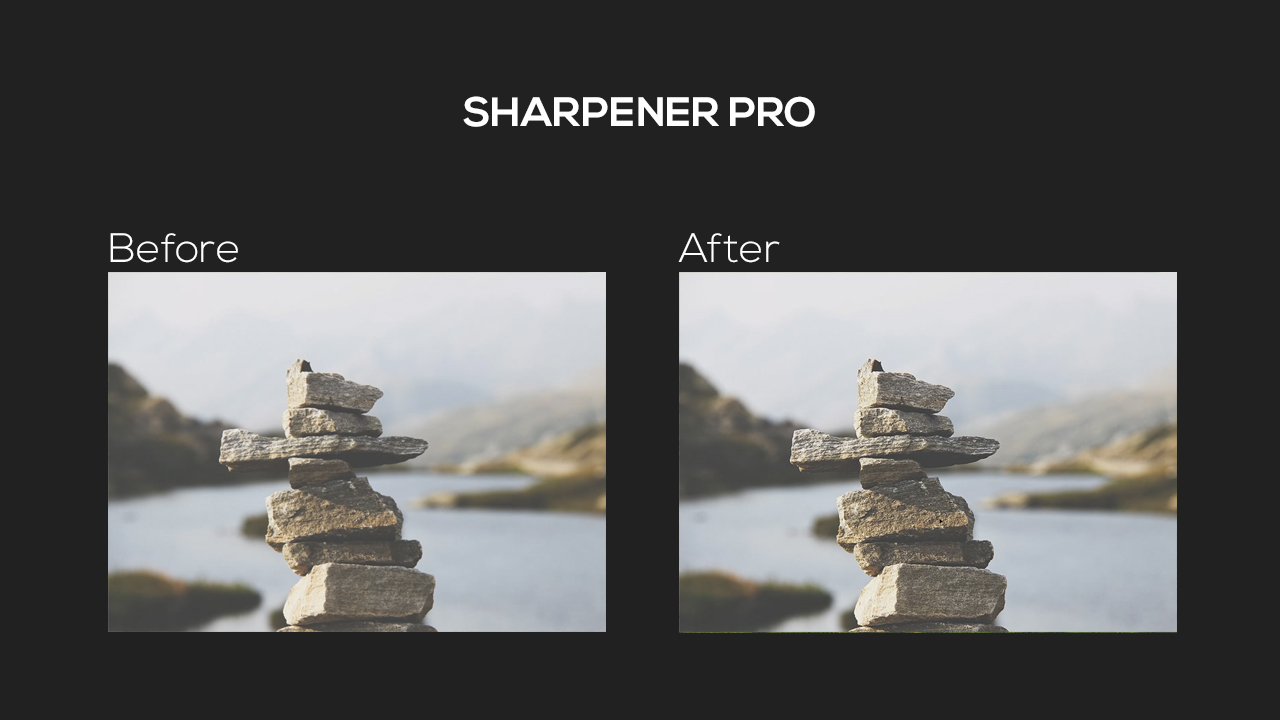
We have all made this mistake: You take a great photo and when viewing it on a large screen, you realize that the image is out of focus. Sharpener Pro will help you rescue your photo.
In the example, we will sharpen the structure of the stones in the foreground so that they stand out more clearly against the background. The Google Nik Collection provides two tools for this purpose. One to edit RAW files and one to edit image files. In our example, we will edit a JPG file using the Output Sharpener. For a better overview, we split the image directly and move the red preview line to the centre of the stones. First we increase the adaptive sharpening. Then we slightly turn up the sliders for creative sharpening. Be careful and avoid overediting the image or otherwise the whole image will be impaired by too much noise. Once you have made all settings, click the OK button to recompute the image sharpness.
Tips to facilitate working with the Google Nik Collection:
- You will achieve the best results if you move a slider only slightly.
- Begin by editing the colours and then add new effects.
- Use several presets because these are optimized for the respective purpose.
- Try out different presets to find the most suitable one.
- Always begin by transforming pictures into smart objects to enable the image to be edited later on.
- Use the preview because the basic idea of the image can get lost when making too many modifications.
We recommend:
Install the Google Nik Collection and play around with all its functions. This plug-in will revolutionize the way you work with Photoshop.
Credits:
By media designer Christoph Ullrich.
The pictures in the example are from the free pexels image database.