
If you want to use a PDF on screen or make it available for download, its file size should be as small as possible. We show you how to compress a high-resolution PDF, using Windows, Mac and online tools.
The PDF file format from Adobe is a widely used, platform independent document format. The “right” size of a PDF document will always depend on its application.
A print-ready PFD for a flyer or posters needs to be in high resolution, whereas a lower resolution is sufficient to display the document on a screen or print it on your ink jet printer. In this case, a reduced size PDF or an optimised PDF will do. The real challenge is to reduce the file size of an existing PDF in order to comply with upload limits, for example. This can be even more challenging when you don’t have the original file or the source application.
There are several ways to tackle this task: The results depend not only on the selected method or compression tool but also on the content of the PDF to a considerable extent. If you don’t want to reduce just the file size but also the page size, e.g. from A4 to A5, we have put together some information at the end of this article.
Contents
Compressing PDFs: Windows users
As a Windows user you can use two different methods to compress a PDF to reduce its file size: You can save it as a reduced size PDF or as an optimised PDF.
Solution 1: Saving the PDF with a reduced size
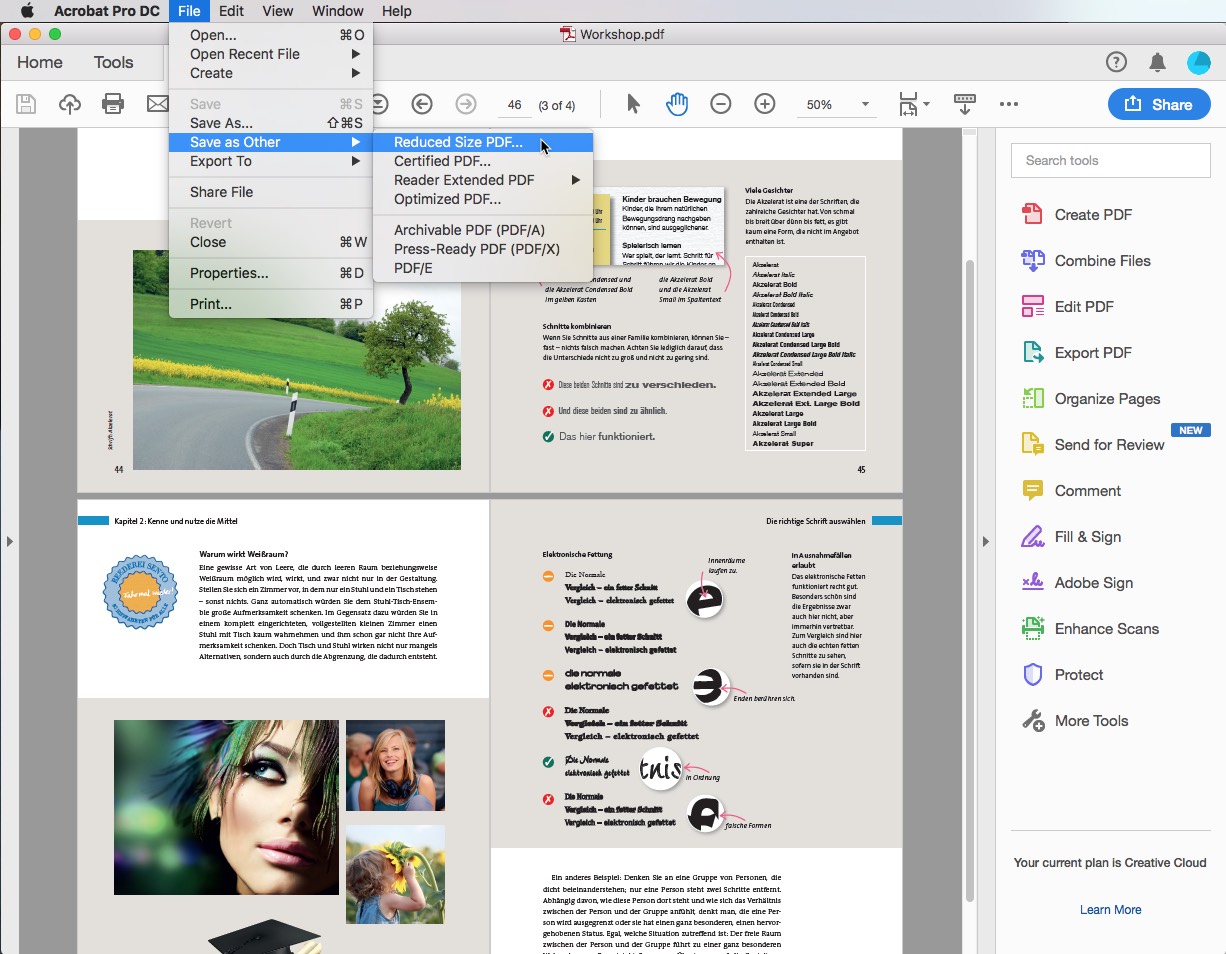
The first method is not always the best but the most obvious one: Open the PDF in Adobe Acrobat Pro DC and choose File > Save As Other: Reduced Size PDF. (Unfortunately, this command is not available in the free Acrobat Reader. In this case, you can try online tools)
Acrobat then automatically resamples and compresses the images. Moreover, embedded Base 14 fonts (Courier, Helvetica, Times, Symbol and Zapf Dingbats) as well as embedded subsets are removed, the document structure is compressed and invalid bookmarks and digital signatures are deleted. Subsequently, the new PDF is saved with a reduced file size. This method does not allow the user to influence the level of image compression or resolution. The images are automatically reduced to 150 dpi which can result in quality loss of the image data.
We use a four-page InDesign document comprising multiple images, a large Illustrator graphic, a placed InDesign file, text and various fonts with an original file size of 80 MB.
Exported using the “Press Quality” setting, the PDF is still 13 MB large, too much to make it available online. After using Acrobat’s on-board compression function, the file is still 10.3 MB large.
Our conclusion: This is a quick and easy method which doesn’t always yield a satisfactory result because especially the image quality suffers. The success of this method strongly depends on the content and the previous condition of the PDF. Responses range from an enthusiastic “Wow, that’s super-small!” to a disappointed “We-eeell…”.
Solution 2: Compressing the PDF and saving it as a reduced PDF
For the second approach, let’s take a closer look at the setting options in a PDF. What makes a PDF file large? Which factors contribute to file size? Can’t we just reduce these factors? And, which data types can we compress?
We can use the Audit Space Usage to get a report of the total number of bytes used for specific document elements. With the PDF opened, click File > Save as > Optimized PDF. Then click Audit Space Usage in the upper right (this option is only available in the Pro version).
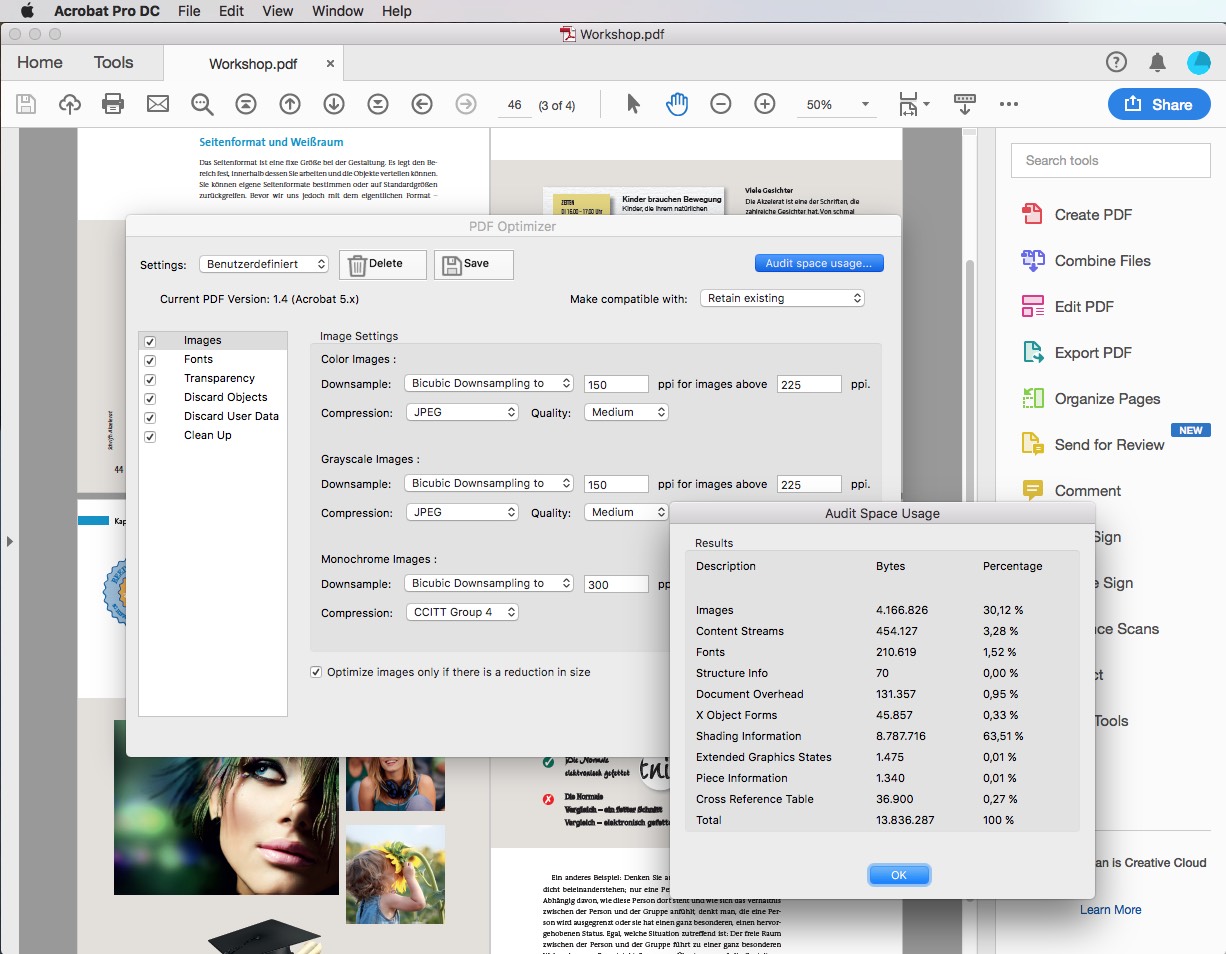
The results are displayed in bytes and as percentages of the overall file size. Depending on the content and export settings, the document overhead often takes up the most space. Containing meta data, hidden layers, file attachments or data written by other applications, it is often responsible for the majority of the file size.
After you have identified the memory hogs, you can proceed with tackling the individual components. Compared to the first solution (Save as a reduced size PDF), the second approach lets us influence the compression quality: We manually adjust the individual setting options of the file and save it as an optimised PDF in compressed form.
After confirming the space usage audit, we can compress the file size of the PDF with manual setting options. We have access to six different panels that allow us to influence the compression rate and image quality. Depending on the PDF file and its application, you should carefully check each panel.
Practical: All manual settings can be stored as a preset and named to be accessed quickly when needed. Adobe already provides two default settings, namely “Standard” which reduces the image resolution to 150 dpi among others and “Mobile” with a resolution reduction to 96 dpi and some information deleted from the document overhead.
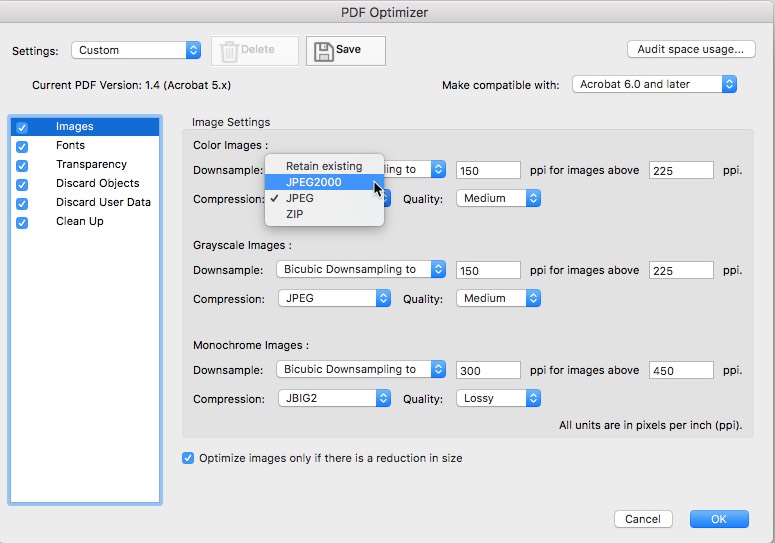
“Images” panel – effectively reducing image size
The Images panel is one of the most efficient setting options. It enables both the resolution and the type of image compression to be adjusted individually. The dialog looks similar to other Adobe file export dialogs. Every user has to decide about the desired image quality themselves.
If the images in the PDF are for decorative purposes only, 72 dpi are sufficient. But if they are relevant to understand the content, you should not reduce the resolution too much. You can also play around with the quality here: JPEG or JPEG2000 compression yields good results especially for photos with colour gradients. ZIP compression in contrast is suitable for large spot coloured areas. If you choose at least Acrobat 6.0 or later in the Make compatible with list box, the JPEG2000 format will be added as compression type. For black-and-white images, it is best to choose JBIG2 compression which is available for a compatibility with Acrobat 5 or later.
Tip: Play around with the “Quality” option which the JPEG and JPEG2000 compression methods offer. Often, reducing the quality will significantly shrink the file size without decreasing the resolution too much. The JPEG2000 compression also provides a loss-free option.
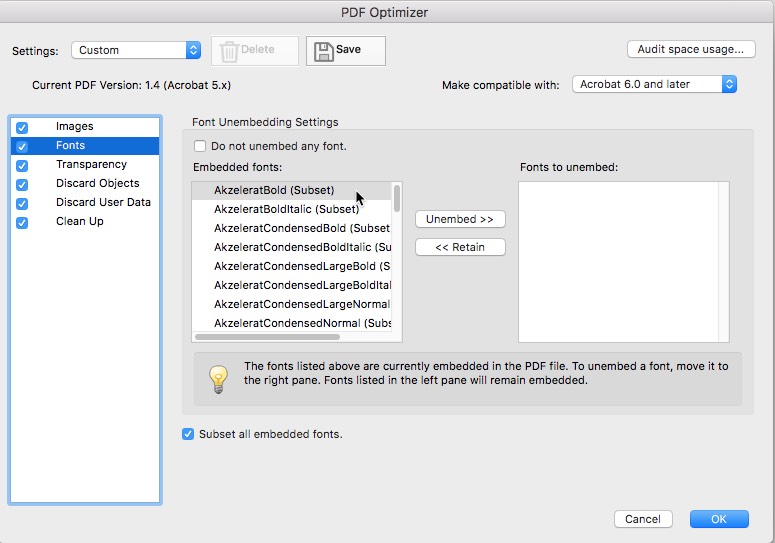
The “Fonts” panel – use with care
You should be extremely careful when it comes to embedded fonts. One of the key benefits of a PDF is that you don’t need to have any of its fonts installed on your computer to display the original layout with the original fonts on your screen. This works because the fonts are embedded in the document. By introducing subsets, Adobe has found an intelligent solution to embed only fonts that are actually needed. If a specific font is used in a short title of six different characters only (such as “images”), for example, only these six characters will be embedded in the PDF. The remaining characters of the alphabet are not needed and thus don’t take up memory space when they don’t have to.
If you disable font embedding, you as the originator of a PDF document can no longer control whether and how this text will be displayed on the recipient’s side. Moreover, fonts don’t use a lot of memory space which means that they are not very relevant to yield an optimum result with a reduced file size. In our example file, fonts only account for 210 bytes, or 1.5 percent, which is why we can safely neglect them.
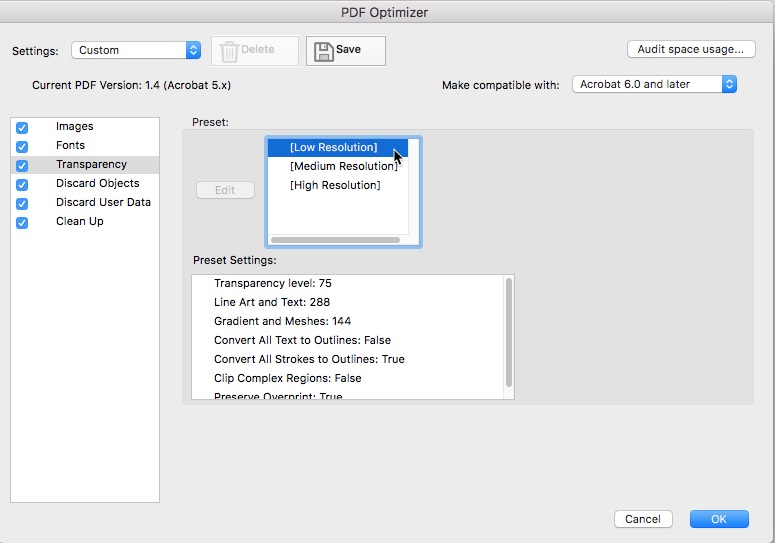
“Transparency” panel – save space depending on the document
Transparency can quickly bloat a document. Already a minor shadow around an image will be sampled as transparency. When flattening transparency, these areas will irreversibly be converted to vector data and rasterised data. Generally, PDF documents created in Acrobat 5 and later support transparency. Accordingly, this dialog is greyed out in the compatibility settings of Acrobat 4.
Depending on the PDF file, transparency flattening might already have been performed during the export. But unfortunately, this is not as efficient as in the subsequent optimisation. The PDF/X-3 format, for example, automatically flattens layers and transparency in high resolution. So you may not get any storage reduction out of a subsequent transparency optimisation for the same PDF/X-3 document since the flattening cannot be undone.
Note: To effectively use transparency flattening in the optimisation dialog, the PDF must still contain the native transparency.
Our example PDF was saved with the “Press Quality” setting. It is 13 MB large and still contains native transparency. Now if you optimise the PDF using the transparency flattening options described here and choose “Low Resolution“, you will be pleased to notice that the file size has shrunk to 5.9 MB.
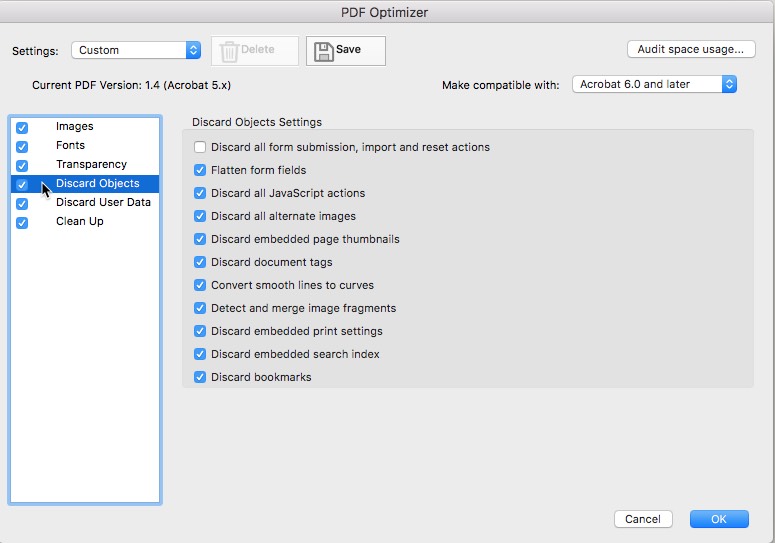
“Discard Objects” panel – weighing between file size and user friendliness
The Discard Objects panel lets you delete unused objects from the PDF. This includes embedded page thumbnails that take up storage space. In Acrobat 5 and later, thumbnails are generated dynamically when you work with the side panel. This panel enables you to discard print settings such as page scaling, a useful but storage-intensive index or bookmarks. A word of caution: These functions may well be useful, especially in PDF documents used online. So it’s important in each case to weigh whether to give priority to a reduction of the file size or to legibility and user friendliness.
“Discard User Data” panel – the document overhead
The Discard User Data panel also provides options to shrink PDF documents. This dialog box tackles the document overhead which accounts for 1.85 MB or 13 percent in our example. Remove form fields or file attachments if necessary. You can also delete metadata, comments and JavaScript actions.

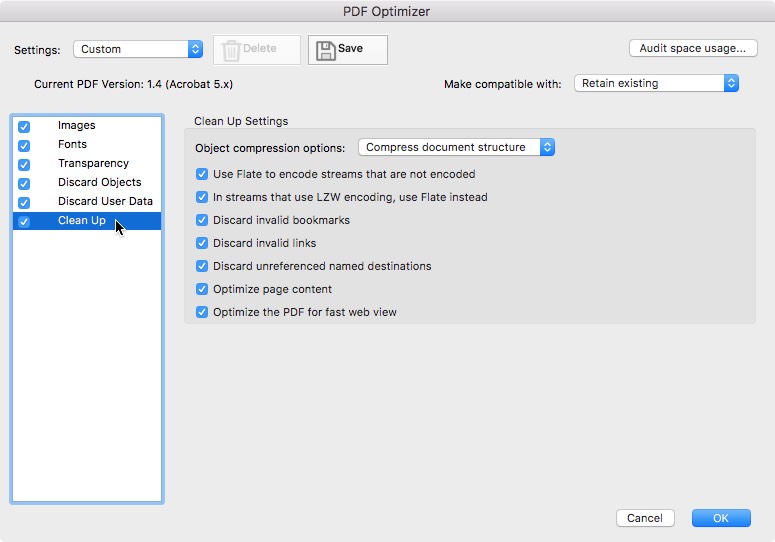
“Clean Up” panel – compress the document structure
The options in the Clean Up panel allow you to remove useless items from the document. Almost none of the components you delete here have an influence on the functionality of your PDF. Since their contribution to reducing the file size is rather insignificant, they can be ignored.
Our conclusion: a promising approach to downsizing PDFs
Thanks to manual optimisation, we were able to reduce our PDF from just under 13 MB to 2.8 MB – with little loss in terms of image and shadow quality. The images and resolution were compressed to 150 dpi, transparency was flattened and some redundant information deleted. For comparison: Acrobat’s on-board function was able to reduce the PDF file size to a meagre 10.3 MB in the first attempt.
Compressing PDFs for Mac users: the Preview
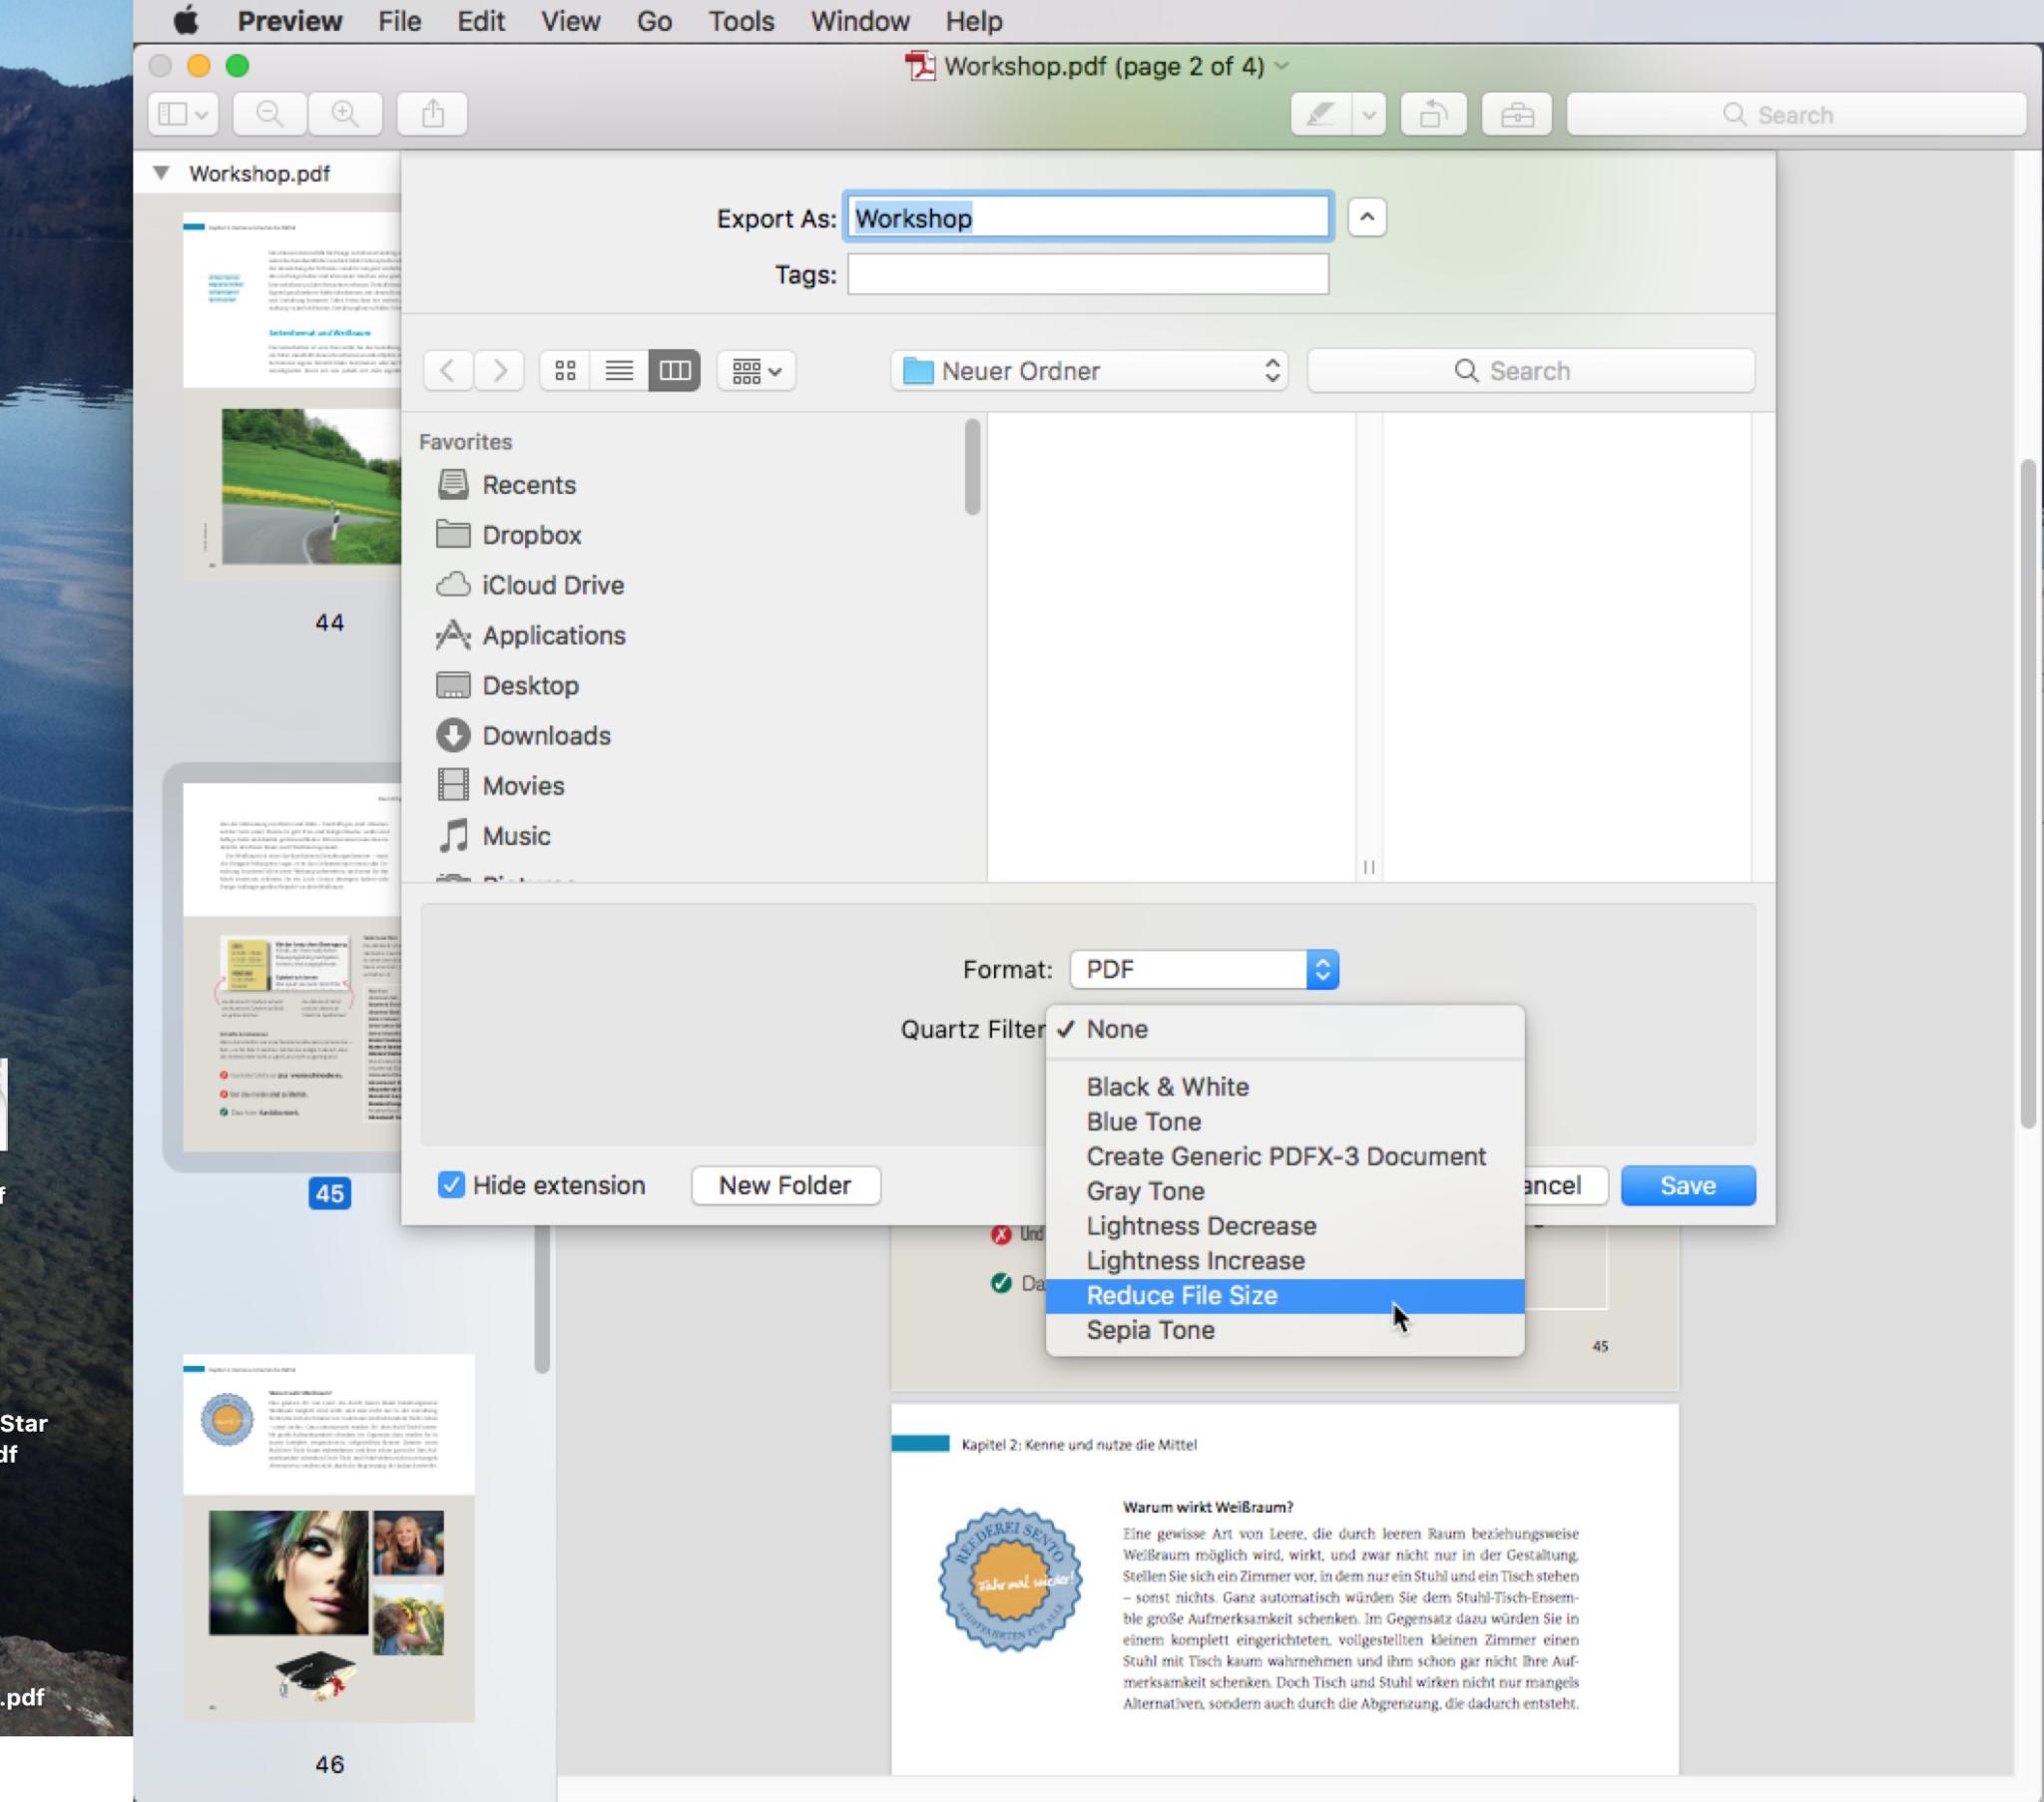
The Preview is a powerful application with many useful functions. It is also a mighty compression tool to reduce the file size of a PDF document if you know how to operate it. After opening your bloated PDF, choose File > Export to create a new and smaller PDF. Important: Enable the Quartz PDF Filter which comes with Mac OS in the next step to reduce the PDF file size and not increase it. So choose a quartz filter first and then click Save. If you export the file without the filter, the PDF will become even bigger than before.
Quartz, the graphics engine of the Macintosh operating system, uses the PDF format as an internal graphic model and provides several quartz filters by default which you can choose in the preview when exporting documents. You can also convert the PDF file to grey scales using the “Gray Tone” filter and take some bytes off your document. The “Reduce File Size” filter obviously sounds enticing. That is exactly what we are looking for. But the result is disappointing: Although the file size does shrink considerably, the quality loss is very visible, rendering the file useless. Therefore, we have to do some manual work first.
Manual intervention: create a new quartz filter
To make manual adjustments, open the ColorSync utility and click Filter in the menu bar. Here you see the quartz filters generated by Apple which we already encountered in the Preview. Because they cannot be edited, we will create a new filter by duplicating and editing the “Reduce File Size” filter. Click the triangle on the right and choose Duplicate Filter.
The new filter appears at the bottom of the list and can be renamed with a double-click. We named the quartz filter “small file – acceptable quality” in our example. Click the triangle in front of the name to show and edit the compression options. Set the resolution e.g. to 150 dpi under Image Sampling. The fields Scale, Max. and Min. Pixels should be empty; the Quality field should be set to High. Under Image Compression, you can usually apply JPEG and good quality as preset. After you have edited your filter, close the utility. The new filter is now displayed automatically in the Preview and can be used.
Compressing PDFs – with and without software
There are also various web-based tools available to compress PDFs so you don’t need to download and install a desktop application. Just upload your PDF to the website or server of the provider and after a few seconds, you can download the file again, hopefully in good quality and with a reduced file size.
Pros of web-based services: They provide quick access and don’t require users to install additional software applications that take up more and more memory space. But there are also disadvantages: Since you are uploading your file to an external server, there is always the risk of data leakage. What is more, you cannot always specify the type and strength of compression and thus not change the image quality for example. We have taken a look at the most common providers and their web tools:
Compressing PDFs with one mouse click
The Ilovepdf compression tool shrinks our test files by 30 percent on average and displays the result afterwards. However, this comes mostly at the expense of the image quality. The user cannot make any manual settings.
PDFCompressor starts the compression process without further prompting and displays the results in percent. Although the provider promises on its website not to “degrade the resolution” but the quality of the images suffers considerably here as well. Fortunately, the file size is nice and small.
SmallPDF compresses only one PDF at a time. The Pro version is needed to add multiple pages and files in one step. When we tested the tool, it was surprisingly fast and compressed less than the other two providers.
Tools that enable manual settings
Other compression tools such as online2pdf.com let users have a say in the compression process. They can edit settings on quality, resolution and colour mode of images. PDF2Go has adopted a similar approach. It provides predefined settings to specify the compression. pdf24 Tools, too, offers some options to influence the compression process.
Overall, we could not determine a clear winner in our test because the result will always depend on the content and format of the PDF to be reduced.
Compressing and scaling PDFs: adjusting the page size
It is not always the file size that has to be adjusted. Sometimes it can be necessary to change the page format. For example, if you want to change a PDF from A4 to A5, you can use different approaches to scale down your file.
The “normal” way is of course to edit the source file. But if it is not available, the following suggestions should help.
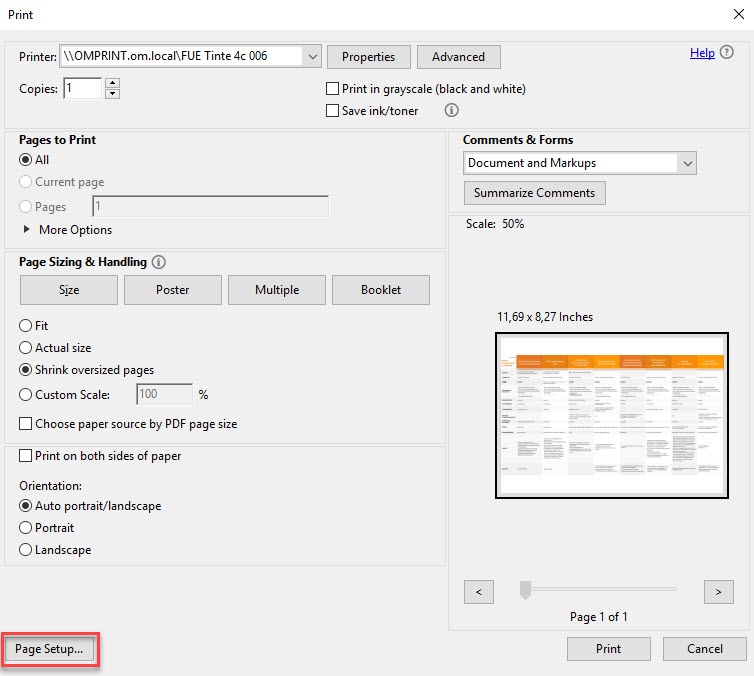
In Acrobat DC Pro, the easiest way is to click (File > Print) > Printer: Adobe PDF. Then click Page Setup and enter the target dimensions under Size > PostScript Custom Page Size Definition (148.5 mm x 210 mm for A5). Subsequently, you can create the new PDF.
Sometimes removing the margins already brings the desired outcome. To learn how to use Acrobat or smart web tools to crop a PDF, read our Cropping PDFs article.
InDesign as an alternative
Using Adobe InDesign is another option. Create a new document of the size you need, A5 in our example. Choose the Rectangle tool from the tools panel and drag it out to the desired size. Then click File > Place and select your PDF. Make sure that the Show Import Options check box is enabled before confirming the dialog.
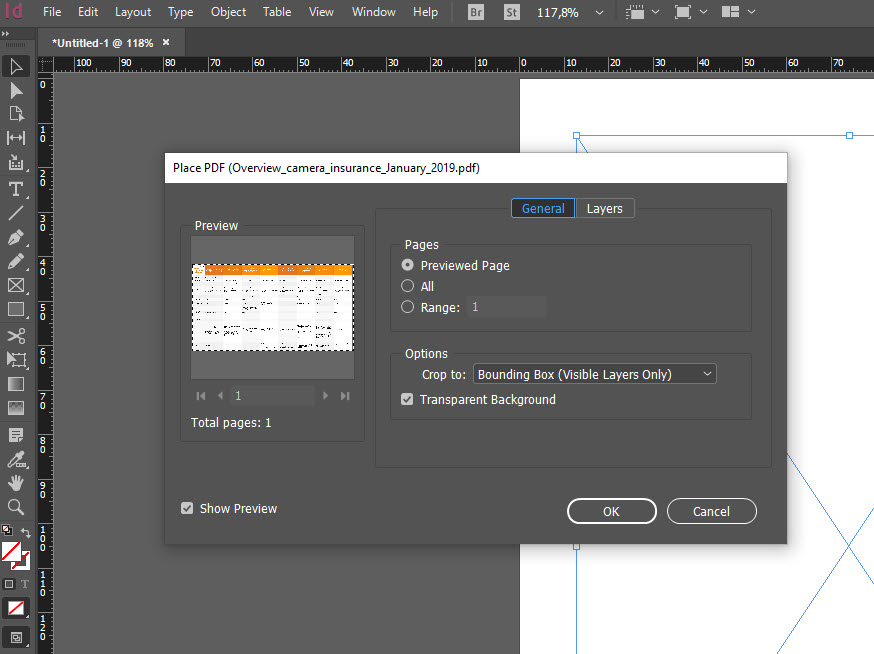
In the next dialog, you can specify which pages of your PDF to import into the InDesign file.
As PDFs generally have more than one page, it would be rather tedious to drag out a new image frame for each single page. Scripts come in handy here and InDesign fortunately has them on board. Choose Windows > Utilities > Scripts and double-click the Place Multipage PDF script. The further process is self-explanatory. We received some error message in our test but the document was placed correctly.
Alternatively, you can use the Multi Page Importer script by Mike Edel. It is available for free via Github.
Conclusion: Compressing PDFs: several ways to success
There is no one best way to compress a PDF. There are many approaches to reduce the size of a PDF file. The success of data compression always depends on the PDF and its application.
Web-based tools usually do the job quickly and hassle-free. Most services are free and easy to use. But if you want to adjust the compression type to influence the results, the full version of Acrobat DC with its detailed setting options is the better choice. By saving the collected settings as presets, you can at least save a lot of time when repeatedly compressing PDFs. The file size reduction definitely yields satisfactory results.
A plus for Mac users: They have the Preview, an all-round tool, which is a free alternative to Adobe Acrobat. Making some minor adjustments, users can influence the compression process here as well.
Credits:
Screenshots of the editing process in Acrobat Pro DC, Acrobat Reader, Mac Preview and InDesign
Title photo: VectorKnight via Shutterstock